Amazon AWS Tutorial
What is AWS? – Amazon Web Services(AWS) is a cloud service from Amazon, which provides services in the form of building blocks, these building blocks can be used to create and deploy any type of application in the cloud.
These services or building blocks are designed to work with each other, and result in applications which are sophisticated and highly scalable.
Each type of service in this “What is AWS” blog, is categorized under a domain, the few domains which are widely used are:
- Compute
- Storage
- Database
- Migration
- Network and Content Delivery
- Management Tools
- Security & Identity Compliance
- Messaging
The Compute domain includes services related to compute workloads, it includes the following services:
- EC2 (Elastic Compute Cloud)
- Lambda
- Elastic Beanstalk
- Amazon LightSail
The Storage domain includes services related data storage, it includes the following services:
- S3 (Simple Storage Service)
- Elastic Block Store
- Amazon Glacier
- AWS Snowball
The Database domain is used for database related workloads, it includes the following services:
- Amazon Aurora
- Amazon RDS
- Amazon DynamoDB
- Amazon RedShift
The Migration domain is used for transferring data to or from the AWS Infrastructure, it includes the following services:
- AWS database Migration Service
- AWS SnowBall
The Networking and Content Delivery domain is used for isolating your network infrastructure, and content delivery is used for faster delivery of content. It includes the following services:
- Amazon Route 53
- AWS CloudFront
The Management Tools domain consists of services which are used to manage other services in AWS, it includes the following services:
- AWS CloudWatch
- AWS CloudFomation
- AWS CloudTrail
The Security & Identity, Compliance domain consist of services which are used to manage to authenticate and provide security to your AWS resources. It consists of the following services:
- AWS IAM
- AWS KMS
- AWS Shield
The Messaging domain consists of services which are used for queuing, notifying or emailing messages. It consists of the following domains:
- Amazon SQS
- Amazon SNS
- Amazon SES
- Amazon Pinpoint
What is AWS? | AWS Training | Edureka
To learn more about the products of AWS, you can refer to our Amazon AWS Tutorial, which contains detailed information about all of these services.
You have a fair idea now about what is AWS, and the services which are covered in AWS, let’s go ahead and straightaway apply this knowledge to build applications. You might feel that you don’t know much about AWS, but then,
Sometimes you have to run before you can walk!
Keeping that in mind, let’s understand how does one build applications in AWS:
Building Applications
First and foremost, you should analyze, what is your application about? Is it something that requires you to be worried about the underlying infrastructure? Is it something that requires a database? Is it something which will require monitoring?
So, once you know all the requirements about your application, you can pick the domain, and hence choose a service.
Like for example, you want to deploy an application in AWS, which does not require you to worry about the underlying architecture, which service will you choose?
Well, in the compute section there is this service called Elastic Beanstalk. You just upload your application, and AWS does the rest for you. It’s that simple!
Of course you wouldn’t know about any of these services without using them right? That’s why AWS came up with an amazing free tier option.
Who is eligible for a free tier?
Every customer from the time he registers on AWS, receives the free tier option, and is eligible for the same till 1 year from the time he registers.
How shall this help?
You can try every application in AWS and learn! The more you practice, the more you learn, what is AWS.
So basically, you learn for free!
How do you sign up on AWS?
Step 1: Go to aws.amazon.com and click on Create an AWS Account.
Step 2: Click on ‘I am a new customer’ option, enter your email address and at last click on Sign In.
Step 3: On the next page, fill-in all the relevant information and click on Create Account.
Step 4: On the next page, fill in your personal details and click on Create Account.
Step 5: You would be asked to enter your credit or debit card details on this page, once you do that, proceed by clicking on continue.
Step 6: Next Step would be to verify your phone number, enter the details and click on Call me Now.
Step 7: You will get a call from AWS and will be asked to enter a pin, next up you will be selecting your plan for AWS, but before that click on Next.
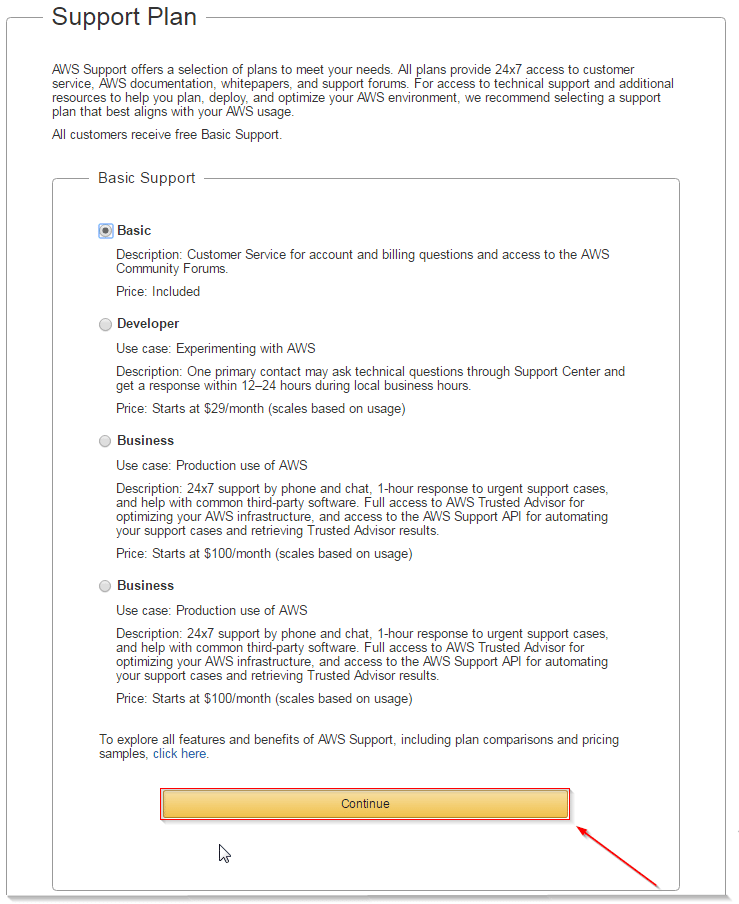
Step 8: You shall select a plan, which suits you, I will be going with a basic plan since this account would be for personal use.
Step 9: Congrats! Your AWS Account is ready to be used! Go sign in and play!
Now, since you have an AWS account at your disposal, why not do some hands-on? What say?
Let’s host a PHP website on EC2 and back it up with an RDS MySQL database. Not familiar with the services? Let me brief you up:
EC2 (Elastic Compute Cloud) is a compute service offered by AWS which provides resizable compute capacity in the cloud.
So in simple words you get a server with custom compute capacity, this capacity can be adjusted according to your needs. Cool, right? Want to know more,.
Let’s discuss RDS now, so RDS is Relational Database Service, which includes different databases like MySQL, MongoDB etc.
So basically, RDS manages these databases for you, How? Check out this blog on AWS RDS.
Demo
We will be creating a small application on EC2-RDS infrastructure in this What is AWS blog. By the end, you will have a PHP application on EC2, backed by a fully managed MySQL server.
Let’s start by deploying an EC2 instance first in this What is AWS blog.
Step 1: Login to AWS Management Console.
Step 2: Select a region from the drop down.
Step 3: Click EC2 under Compute section. This will take you to EC2 dashboard.
Step 4: Select Launch Instance and hence select an AMI, for our example in this What is AWS blog, we will be selecting a Windows 2016 Server Instance which falls under free tier.
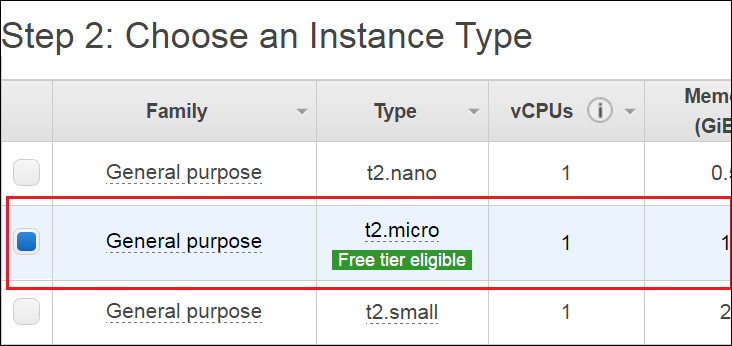
Step 5: Once you select your desired AMI, select your instance type, this is basically where you decide how much computing power you need to start, since ours is a small application, we shall suffice with the free tier.
Step 6: Configure all the details and then click on add storage.
Step 7: Here you will be configuring your storage devices, once done click on tag instance.
Step 8: Here you will be tagging your instance, this is how your instance will be identified.
Step 9: Now you will be configuring your security group.
Step 10: Check all your settings, once verified launch your instance!
Step 11: In the next step you will be prompted for a key pair, create one and download at a handy location.
Step 12: Select your instance and click on Connect.
Step 13: Once you click connect, you will be prompted with the following screen. Copy the public IP and then click on Get Password.
Step 14: Select the key-pair that you downloaded, then click decrypt password.
Step 15: Copy the password and the public IP, keep it handy for the next step.
Step 16: We have the Public IP and the password now, let’s connect to our instance! Open the remote desktop manager. Enter the public IP address and click on Connect.
Step 17: Enter the saved password here and click on OK.
Step 18: Congratulations! Windows Server on EC2 at your service!
Next, Let’s create a RDS instance for MySQL
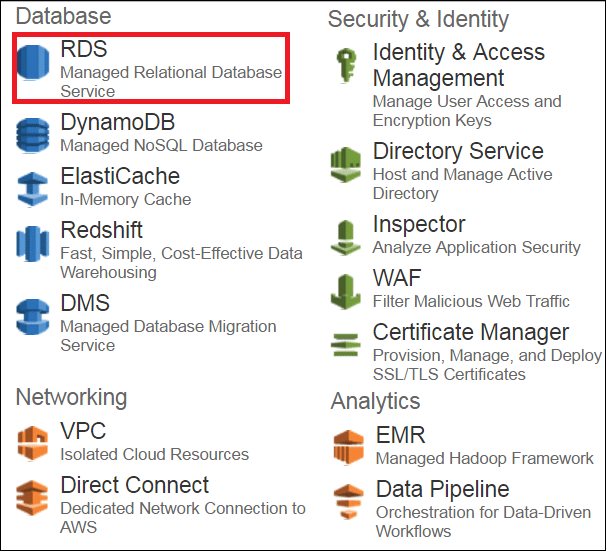
Step 1: Select the RDS service from the AWS Management Console.
Step 2: Since we will be launching a MySQL instance, select the MySQL instance from the list of DBs. Moving forward in this What is AWS Blog, let’s go to Step 3.
Step 3 : Since we are creating this instance for demo purposes, we will be selecting Dev/Test option and click on Next Step.
Step 4 :
On the next page you will be filling the following details:
- You can select your desired Db instance here
- You can select whether you want Multi-AZ enabled in your MySQL Db.
- You can select how much space you want to allocate to your Db instance, it can vary from 5GB to 6TB.
- In the end you will be setting your username and password for your Db Instance
Step 5 :
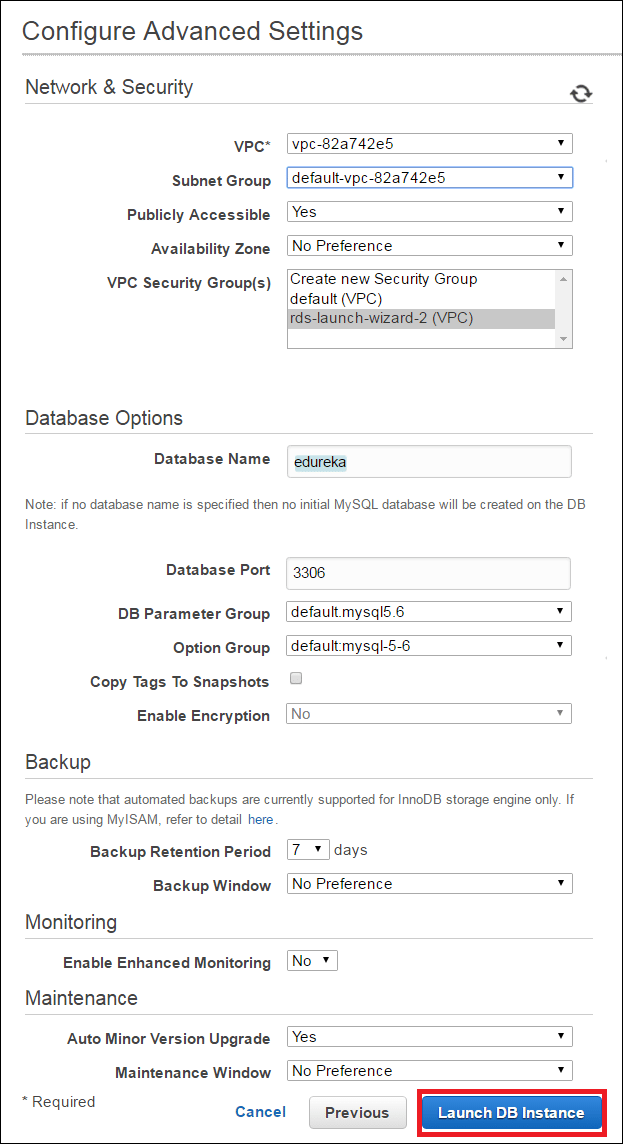
In the next step, you will be configuring Advanced Settings for your DB
- You will be selecting the VPC here, if you do not wish to launch your instance in a VPC you can leave the default settings and move ahead.
- In the next section you can select which version of the Db you want to use, for our example we are using MySQL 5.6
- In the next section you can set your backup preferences, like the retention period etc.
- After that we will be setting the maintenance window, this is the time frame during which your Db instances will be updated.
- Once you fill all the details, you will be launching the Db instance!
Step 6 :
Congratulations! On your first RDS Instance!!
Next in this What is AWS demo, let’s configure your RDS instance to connect to your EC2 server.
Step 1: On your RDS Dashboard, select your RDS instance.
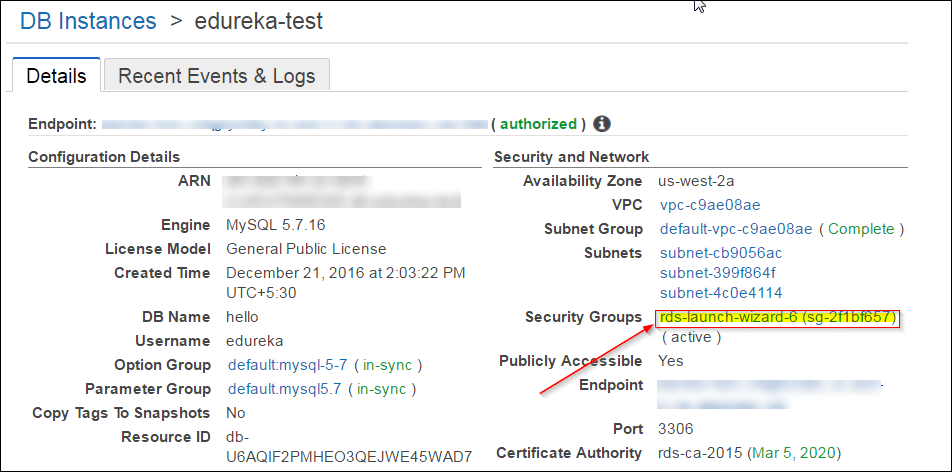
Step 2: You have to edit the Security Group here, Why? Because you want your EC2 instance to be able to connect to your RDS Instance, for that you have to add the IP address of your EC2 instance here.
Step 3: Select the Security group, then select the Inbound rules, then click on Edit.
Step 4: Select the MySQL/Aurora, and then enter the Public IP address of your EC2 instance in the second field. Any IP address that you enter here should be followed by a ‘/32’ to convert it into CIDR notation. In the end Click Save.
That’s it! Your RDS instance is ready to receive commands from your EC2 instance.
What next? You would need a MySQL Workbench or a server to connect to your RDS instance. I installed MySQL on the EC2 instance itself, you can do that on your localhost too.
Note: If you are doing it on your localhost, be sure to add your IP address in the Security Group of your RDS instance, like we did in the above step in this What is AWS blog.
Let’s connect to the RDS Instance Now!
Step 1: Open the command prompt and navigate to the bin folder of your MySQL.
Step 2: Next up, copy the endpoint from your RDS instance dashboard, you will be needing this in the next step in this What is AWS blog demo to connect to your RDS instance. The endpoint is how your RDS instance gets identified. Following the endpoint is the port number ‘3306’ which you shall also need in the next step.
Step 3: Come back to the command prompt and type the following command, you will prompted for the password, enter the password that you entered while you created your RDS instance and you are set!
| 1 | mysql -h xx.rds.amazonaws.com -P <port number> -u <username> -p |
You can create your database and relevant tables here, I have already created mine, for your reference I am creating the sample ones here.
Your RDS service is set now!
Let’s move on, to the most exciting part of this What is AWS blog! Hosting your website!!
Step 1: On your EC2 instance, click on start and then Server Manager.
Step 2: Click on Add roles and features.
Step 3: Click on next on the first page, on the second page, select the following option and click Next.
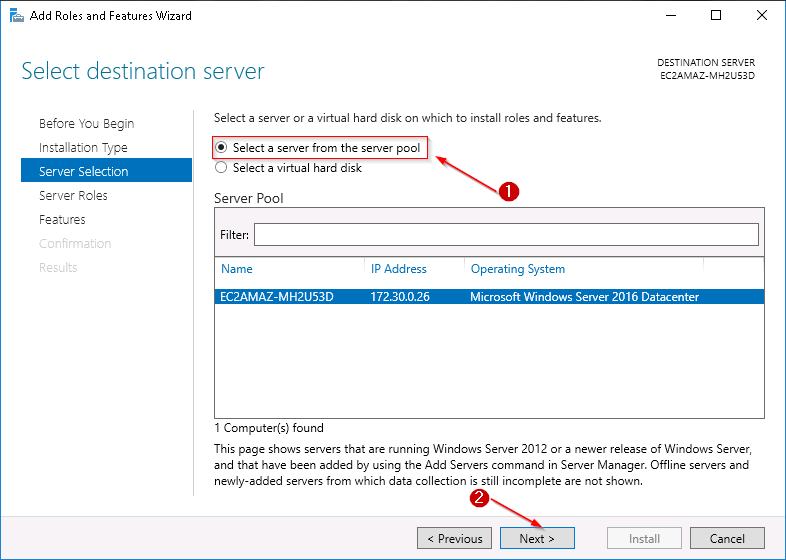
Step 4: Select the server pool option and click on Next.
Step 5: Select the web server IIS from the list and click on Next.
Step 6: Select the .NET Frameworks mentioned here, and click next.
Step 7: This is the confirmation page, go through what is getting installed, and Click on Install.
Once IIS is installed, you will be able to see it on your server manager dashboard.
After this, install Microsoft Web Platform Installer from here.
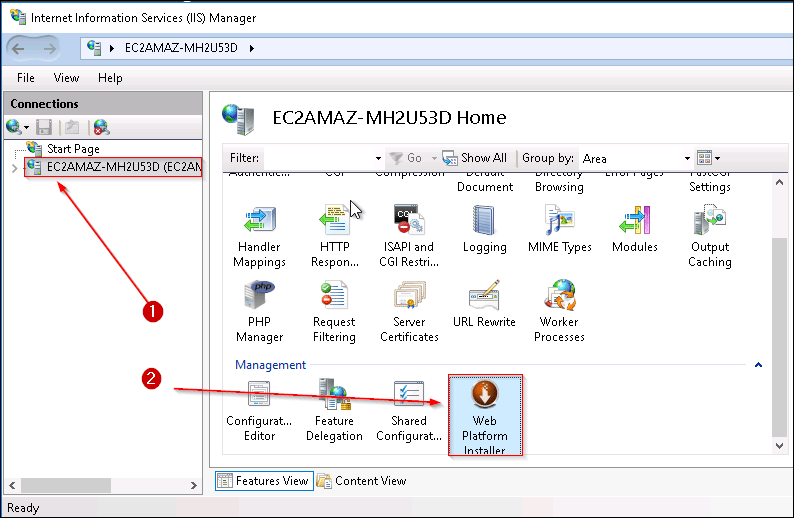
Step 8: Open IIS now, double click the server, and click on the web platform installer from the Management Section.
We will be deploying a PHP web application, therefore we need PHP installed on this server, therefore we would be needing Web Platform Installer.
Step 9 : Search for PHP in the search bar of WPI, install the following package.
*Note: If your PHP Manager is failing to install, there are some values that you have to change in the registry,
Step 10: Once installed, you can view your PHP manager in IIS.
Your EC2 server is ready to host a website now!
Let’s upload your website to this EC2 server.
Step 1: First, copy all your files of your website to this folder in “C:/inetpub/wwwroot” on this server.
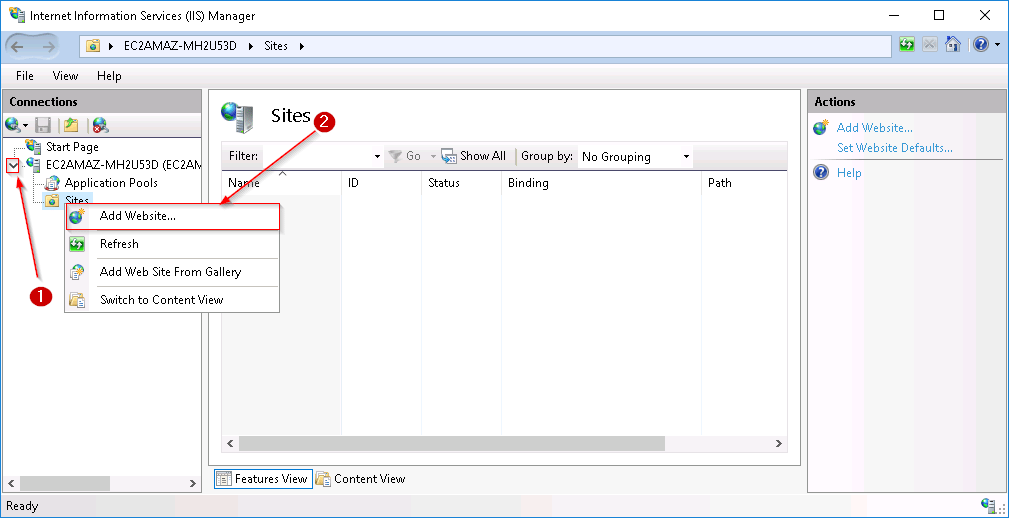
Step 2: Return to IIS, click on your server and then right click on Sites.
Step 3: In the ‘site name’ give a relevant name to your website, in the next step give the following physical path, and in the end click OK.
Your website is now live!
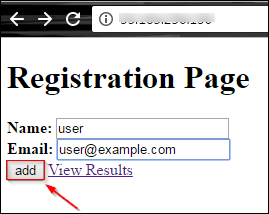
Step 4 : Enter the public IP address of your EC2 instance and voila! Your website is up and running. Enter the details and click on Add.
Step 5 : This shows that your RDS connection with your EC2 instance is working well. So whatever you entered here, is getting stored on your RDS instance, and your website is stored on your EC2 instance. Click on Go Back.
Step 6 : On the main page, click on View Results. And you shall see this page.
These are the records which are present in your MySQL table.
Need the code for this application? Here you go:
index.php
<!DOCTYPE html>
<html>
<body>
<h1>Registration Page</h1>
<form action="process.php" method="post">
<b> Name: </b> <input type="text" name="name">
<b> Email: </b> <input type="text" name="email">
<input type="Submit" value="add">
<a href="result.php">View Results</a>
</form>
</body>
</html>
process.php
<body>
<?php
$name=$_POST['name'];
echo '<br />';
$email=$_POST['email'];
$hostname='edureka-test.cx9qgfyl1dhy.us-west-2.rds.amazonaws.com';
$username='edureka';
$password='hemant1994';
$dbname='edu_test';
$usertable='test';
$yourfield='name';
$con=mysqli_connect($hostname,$username, $password) OR DIE ('Unable to connect to database! Please try again later.');
mysqli_select_db($con,$dbname);
$query = "insert into ".$usertable." values('".$name."','".$email."');";
mysqli_query($con,$query) or die("Not Updated!");
echo "Insertion Successful!!";
?>
<br>
<a href="index.php">Go Back</a>
</body>
</html>
result.php
<html>
<?php
$hostname='edureka-test.cx9qgfyl1dhy.us-west-2.rds.amazonaws.com';
$username='edureka';
$password='hemant1994';
$dbname='edu_test';
$usertable='test';
$yourfield1='name';
$yourfield2='email';
var_dump(function_exists('mysqli_connect'));
$con=mysqli_connect($hostname,$username, $password) OR DIE ('Unable to connect to database! Please try again later.');
mysqli_select_db($con,$dbname);
$query = 'SELECT * FROM test';
$result = mysqli_query($con,$query);
echo '<body><center><table><table border=3><tr><td><b>Name</b></td><td><b>Email</b></td></tr>';
if($result) while($row = mysqli_fetch_array($result)){
$name = $row[$yourfield1];
$email= $row[$yourfield2];
echo '<br>';
echo '<tr><td>' . $name . '</td>' ;
echo ' <td> ' . $email . '</td></tr>' ;
}
?>
</table>
<a href="index.php"> Go Back </a>
</body>
</html>
So this is it, guys! I hope you enjoyed this What is AWS blog. If you are reading this, Congratulations! You are no longer a newbie in AWS! The things that you learnt in the hands on part of this what is AWS blog, is what is required in an AWS Interview. The more you practice the more you will learn. To make your journey easy, we have come up with Top AWS Interview Questions. To learn more about AWS you can refer our Amazon AWS Tutorial blog. We have also come up with a curriculum which covers exactly what you would need to crack the Solution Architect Exam! You can have a look at the course details for AWS Solution Architect training.


